Quick Start
This page goes through how to quickly get a local Katalogue environment up and running with Docker compose.
Eventhough docker compose might be used in a production scenario, the deployment described here is only intended for demo and testing purposes. There are security issues and risk for data loss with the default docker compose setup shipped with Katalogue. For a production scenario, read up on the Deployment options.
Requirements
Section titled “Requirements”-
Docker - In order to run Katalogue locally you need Docker installed on your computer. You can use either the licensed Docker Desktop application or the open source Docker components which require WSL (Windows Subsystem for Linux) to run on Windows. Docker Desktop.
-
GIT - The Katalogue code is located at https://github.com/kayentaconsulting/katalogue, get a local copy of the main branch. Note that this is a private repo and you need an invite from Kayenta in order to access it.
Start Local Katalogue Instance
Section titled “Start Local Katalogue Instance”- Make sure you have Docker and Git installed.
- Clone the Katalogue source code from GitHub.
- Open a command prompt and
cdto the folder where you saved the Katalogue source code. You should see a file calleddocker-compose.yml. - In that folder, type
docker compose upand hit enter. - Docker will now use the Dockerfiles for each Katalogue service in
/services/*to build and start the Docker images. It will take a minute or two but once the build is complete you should be back at the prompt and see something like this:
- Open your browser and navigate to http://localhost:8080 to access Katalogue.
- Login with these credentials:
- Username: admin
- Password: admin
Stop Local Katalogue Instance
Section titled “Stop Local Katalogue Instance”Type Ctrl + C in the terminal window that is running docker compose to stop the instance.
You can also type docker compose stop in another window to shut it down.
Stopping the container with this command is safe, i.e. data will be persisted.
Re-build Local Katalogue Instance
Section titled “Re-build Local Katalogue Instance”The docker images and containers need to be rebuilt if changes are made to any of the services or docker-compose.yml. The most common scenarios for this is that something went wrong the first time Katalogue was initialized or when you want to upgrade an existing local deployment to a new Katalogue version. I.e. if you download updates to the source code from GitHub.
Run this to do a complete rebuild of all images and containers. This will not delete any data as long as the docker-compose.yml file is used without changes.
docker compose up --build --force-recreate --no-cacheDelete Local Katalogue Instance
Section titled “Delete Local Katalogue Instance”To completely purge the Katalogue instance and its data from docker, run this command.
docker compose down --rmi all -vDocker Compose Commands
Section titled “Docker Compose Commands”Here are a few useful commands to manage the Katalogue instance deployed with docker compose.
The only commonly dangerous command here is down -v, as that will delete the database docker volume where data is persisted.
| Command | Description | Rebuild Image | Recreate Container | Removes Container | Removes Volume | Risk of Data Loss |
|---|---|---|---|---|---|---|
docker compose build | Builds (or rebuilds) service images from Dockerfiles | ✅ Yes | ❌ No | ❌ No | ❌ No | ❌ None |
docker compose up | Starts services (creates containers if needed) | ❌ No (unless needed) | ⚠️ Sometimes | ❌ No | ❌ No | ❌ None |
docker compose up --build | Builds images before starting services | ✅ Yes | ⚠️ Sometimes | ❌ No | ❌ No | ❌ None |
docker compose up --force-recreate | Forces all containers to be recreated | ❌ No | ✅ Always | ✅ Yes (old container) | ❌ No | ❌ None* |
docker compose up --build --force-recreate | Rebuilds images and recreates containers | ✅ Yes | ✅ Always | ✅ Yes (old container) | ❌ No | ❌ None* |
docker compose down | Stops and removes containers and networks | ❌ No | ❌ No | ✅ Yes | ❌ No | ❌ None |
docker compose down -v | Stops and removes containers, networks, and volumes | ❌ No | ❌ No | ✅ Yes | ✅ Yes | ⚠️ Yes (deletes DB data) |
docker compose down --rmi all | Stops containers and removes all related images | ❌ No | ❌ No | ✅ Yes | ❌ No | ❌ None |
docker compose down --rmi all -v | Stops and removes containers, networks, images and volumes | ❌ No | ❌ No | ✅ Yes | ❌ No | ⚠️ Yes (deletes DB data) |
* Data is safe if you’re using the default docker-compose.yml file.
Guide - Adding Data to Katalogue
Section titled “Guide - Adding Data to Katalogue”The postgres demo database dvdrental is included in the Katalogue instance. This section gives a brief walk-through of how to sync that database to Katalogue.
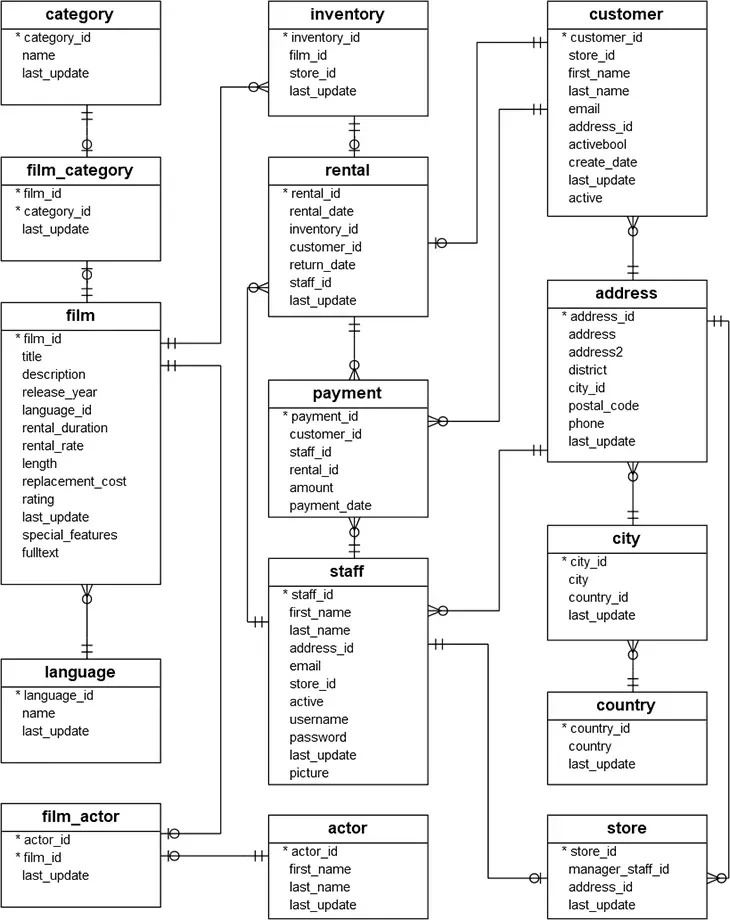
The dvdrental database schema looks like this:
Creating a System
Section titled “Creating a System”- In Katalogue, navigate to the Datasets page found in the navigatin menu to the left.
- Click the + ADD button to create a new System.
- Enter the following information in the dialog:
- Name: DVD Rental
- Type: Demo Application
- Description: This is the PostgreSQL demo database used as demo application in Katalogue
- Click ADD to create the system.
Creating a Connection
Section titled “Creating a Connection”- Click the newly created DVD Rental system.
- Go to the Connections tab and glick + ADD to create a Connection.
- Enter the following information in the dialog:
- Name: DVD Rental Connection
- Connector: PostgreSQL
- Description: Connection used to sync the DVD Rental demo database
- Connection tab
- Hostname: db
- Database: dvdrental
- Username: **
- Password: **
- Click ADD to create the connection.
This will create both a Connection and an associated Datasource Sync Task
Running a Datasource Sync Task
Section titled “Running a Datasource Sync Task”- Navigate to the Tasks page found in the navigation menu to the left.
- Select the Sync DVD Rental task and click the RUN button to sync the datasource. You can run the task either by marking it in the list and clicking the RUN button that appears in the toolbar above the table, or clicking the name Sync DVD Rental to go to the task page and click the RUN button at the bottom of the task details pane.
Browsing the Datasource
Section titled “Browsing the Datasource”- Once the Sync DVD Rental task has run, go back to Datasets -> DVD Rental
- There will now be a dvdrental database under the Datasources tab. Explore the database by clicking it and browsing through its content.